Search This Blog

Wednesday, March 30, 2011

Continuing the Gazebo Build

Sunday was spend installing the electrical. I conveniently have an electrical circuit close by that my other outside outlets work off. I ran conduit inside the gazebo from the entry point in the column across to the center where I installed a round box. This is where a fan/light unit will go. I then put conduit in from the exterior of the column to the existing electrical connection point.


 I also added another GFCI outlet, so now I have an outlet close for anything I might want to plug in under the gazebo. I found some plastic spray paint to use on the conduit so that the light gray color will not detract from the black of the gazebo.


Now, I just wait until I get the fan/light combo and install it and make the final electrical connections. Later this week I plan on washing (now just wash, pressure wash) the patio. On Saturday I plan to pour about eleven 80lb bags of concrete mix to extend the patio on one side. The following week I'll probably mix and pour another dozen bags to complete the other side. This will then give me a full 12 ft x 12 ft concrete area under the gazebo. Then I guess I figure out what to do next.

Saturday, March 26, 2011

Gazebo goes up

After getting the roof frame ready for the panels, I discovered the frame appeared to be "out of square." This caused the roof panels not to line up with some of the holes in the roof frame (rafters). Comparison of the construction information for the Costco version and the Sam's Club version show some descrepancies. The roof panels in the Costco version are held in place with bolts and small "clamps" where the roof panels join on the top and bottom. The Sam's Club version shows a small clamp at the top where the panels come together and a "clamp" bar on the bottom edge with no bolts going through the roof panel itself. This did answer one of my questions, but I still have the panel edge holes not lining up with the "rafter" holes. After some maneuvering, I was able to solve the problem.
This shows the holes in the bottom of the panel and the holes in the rafter.

 This photo shows the "clamp" bar on the bottom of the panel and bolted to the "rafter."
This shows the "clamp" that attaches to the top and goes over the panel.
So, we lifted what is pictured below. I had five guys doing the lifting and three holding and aligning the columns.
Once they got the top and frame on top of the posts, they were bolted together (column to roof frame). Then we squared the columns using a level to make sure that they were plumb.
Then the remaining roof panels, edge clamps and the corner ridge covers were installed.
The columns were also bolted to the concrete using concrete expansion bolts that came with the gazebo kit. One major thing that we encountered was that the measurements from outside of the bottom column trim ring on one side to the same location on the opposite column is 144 inches. However, the top roof. from outside to outside edge is larger. This causes difficulties in determining where the columns need to go. In our case, all measurements were taken from the house outward. We should have included an additional five inches to compensate for the roof overhang.
This is what it looks like now that it is up.
Need to add electrical and the ceiling fan/light combo.

Monday, March 21, 2011

Gazebo - Construction Continues

It was a good weekend overall for construction. had a few problems, mostly trying to do the work of two by myself. Like trying to lift 12 foot beams into place and balancing them on their columns until I could get to the column to put a bolt in. I ended up with this.

    By getting these up, I was able to take measurements and come close to exactly where the columns will end up. I marked both the patio and the pads. It also gav e an idea of where the gutter needs to go over the door. The gutter I installed on Sunday, after two trips to Home Depot. After getting concrete screws long enough I was able to get the gutter installed.


    I also added electrical conduit to the column that will go to the right of the door. This will provide another exterior outlet and the power for the ceiling fan/light that will go in the gazebo.


    Then I started the construction of the roof. I still need to add some cross braces and the roof panels on the side that will go next to the house.

    Then I will probably split it in half and put it up one half at a time and then complete the roof. I'll know on Saturday when I have the help coming.

    Friday, March 18, 2011

    Construction has started

    The assembly of the patio cover (Gazebo) has started. As mentioned in an earlier post, this Gazebo was purchased at Sam's Club. It is the same Gazebo that is also offered at Costco. Manufactured by Sunjoy, it is sold as the Royal Hardtop Gazebo. This model is 12' x12'. Black in color with a solid top.

    The unit was picked up at the store and it came in two large boxes which took a couple co-workers and I to unload from the trailer.

    They were placed on some wood in the backyard to keep them off the ground. Once opened, the boxes contain a 3/8" square tubing interior framework to protect the various pieces. The packing was excellent with each piece wrapped in bubble wrap.


    Even with this packing there is a dent on one of the columns, which I will turn to hide against the house wall. The parts are well numbered, so comparing the parts to the instruction manual is easy. The construction manual is pretty straight forward and does vary from the construction manual of the same gazebo sold by Costco. The Costco manual recommends construction of the entire roof assembly and lifting (6 to 8 people required) it up on top of the columns. The Sam's manual indicates that the roof framework be completed on the ground and then lifted up onto the columns. Either method will work, but the latter method is the one I will probably use. Still plan on having the 6 to 8 people there to help.
    The nuts, washers and bolts that hold the structure together come shrink wrapped to a piece of cardboard. I spent an hour or so taking these parts off the cardboard and putting them into individual marked plastic bags.
    To make sure that I get this located properly on my patio and the two footings that I poured a couple weeks ago, I decided to assemble the columns first. Locate them approximately where I think they should go, then put up the "gutters" which are the outside framework of the roof.

    I can then square the assembly and mark the location on the concrete and drill the holes in the concrete to anchor the columns.

    Then I will take the "gutters" off and assemble the roof frame on the ground. At least that is the plan at this time. I will also make some preliminary steps to install the electrical into the cover (Gazebo).
    The plan is to put the electrical into the bottom of the Gazebo column closest to the hose reel, run it up the column into the top of the structure to a fan/light combo. We'll see how the plan goes.

    Monday, March 14, 2011

    Abilene Weekend

    After a windy drive down US 84 to Abilene, we had a very pleasant weekend. Time was spent in the campground and not off cavorting across the countryside. This let us get to enjoy nature, like these deer that wandered by across the road from one of the campsites.
    Just sitting around visiting with friends (no campfires allowed) is a great way to spend the day. I have some other pictures of Abilene State Park that I will post later. But, the majority of the weekend was spent like this.

    We did find that the campground had been well manicured with few overhanging limbs that interfered with the motorhomes or trailers. I had the saw just in case, and did have to cut a few small limbs so that Larry's slide would go all the way out.

    Thursday, March 10, 2011

    Short trip to Abilene

    Going to take a trip to Abilene State Park this weekend. Kind of an unofficial get together of all camping friends. Abilene State Park is a nice wooded (forested) park. Sites are nice sized, but it does tend to get overgrown, so it is good to have a saw with you to cut limbs if necessary. We were there on July 4 last year and it rained just about the entire time. Because of the trees, satelitte reception can be hit or miss with the antenna on top of the motorhome. If we are going to be there for a period of time, I will usually break out the "portable" dish and use it. Not much on the agenda for this trip, except for a visit to the Perrini Steak Ranch for a great steak and a nice rustic setting. Weather looks like it will cooperate.
    Be the first time that we will board Annie, but the Tipton Pet Hotel will take good care of her until we get home on Sunday.

    Tuesday, March 8, 2011

    Weather is warm - time for backyard projects

    Since taking down the teetering shed cover over our patio more than five years ago, we have searched for a replacement. We talked to several contractors who gave us quotes in the multiple thousands of dollars to construct a new one, whether for wood construction or for metal construction. The prices seemed outrageous. I had almost  decided to build my own using steel posts and wooden trusses covered with metal or fiberglass roofing material. The big problem was I did not want it to drip water over the patio door (who would use it in the rain if you had to walk through a waterfall to get under it) nor did I want one that was five feet above the patio on the "outside" edge. We do get rain, so it needs some slope.
    A month ago (early February) we were walking through Sam's Club and low and behold, there was a patio cover (OK, they call it a Gazebo) that would fill the bill, or fit the space. Yes, we had to compromise. The height on all sides was fine - 82 inches from the patio to the lower edge of the roof, but, it slopes in four directions. OK, we can live with that, I'll put a gutter over the door so water running off the "inside" side of the roof drains into the gutter. No waterfall to walk through. Do have a potential waterfall on the other three sides, but a little post construction gutter work might solve that if necessary. It is metal (steel and aluminum) and is black. OK, not the best color for the hot summer days in Texas.

    So, it is now in the backyard in two large boxes. Waiting for me to put it together. Already have a date set on the calendar when I will have some extra help come and do the heavy lifting.
    Stay tuned for more on this project - including pictures as it goes together and up.


    Sunday, March 6, 2011

    More from our trip

    Well I got sidetracked with the new arrival at our home - the four footed kind.
    One of the places that we tried to go to in the Lake Havasu area three years ago was the Desert Bar outside of Parker, AZ on the Nellie E. Saloon road. A five mile gravel drive from the main highway.
     Once you get there, you find a multi area gravel parking lot - generally filled with vehicles.
    Then there are the old cars, old fire truck, old tractors and the church.
    The church is made of scrap steel welded together. It is said to be a place for weddings, very unique in design as you see below.

    The Desert Bar serves hamburgers and hotdogs and is open Saturdays and Sundays from high Noon to dusk.  It has an outdoor bar that serves the food, beer and other adult libations. And an inside bar the serves the same and soft drinks.
    Also outside are multi level eating areas and stages. The weekend we were there the live music was a group playing music from the 70's. There is a lower stage and on the really busy weekends it also is used to host a band.
    The owner lives on the property and is said to be reclusive. His house is very unique as well.
    The Desert Bar is closed three months in the middle of summer. As you can imagine, it gets just too hot. The median age of the patrons while we were there looked to be mid forties. It is a popular location people from out of town to visit. We sat with some "locals" who said that they occasionally took visitors out, but did not frequent it regularly. It is definitely a place to see if you are in the area. A Google search for Desert Bar, Parker, AZ wil give you a number of "hits."

    Couple pictures from Oatman, AZ. You never know what you might see in that town, besides the burros I mean. Like this photo that I took of an outhouse being moved.
    And, we have David trying to make off with a fortune in gold, only I don't think he can lift it.
    Looking down the street does make Oatman look like a ghost town OK more like a tourist town. That is until the Budwieser truck, the UPS truck and the Bread truck all arrive. It is in a pretty setting.


    We did manage to spend some relaxation time in Lake Havasu City. We enjoyed being on the lake in one of the four spots available. This was our second stay at the Islander RV Resort, the first being three years previous. It is a very appealling resort as you can see from the pictures.
    It is pretty large with RV spots on both sides of a little inlet or probably more accurately a cove on the lake.
    It also has Park Model type homes. These are generally wider and larger than a travel trailer, but smaller than a single wide mobile home. These are set up on normally a block foundation, and in this case a couple more rooms are added to each. The ones we looked at had two bedrooms, a bath, living room and an outdoor space.
    It also has a boat launch and dock facilities.

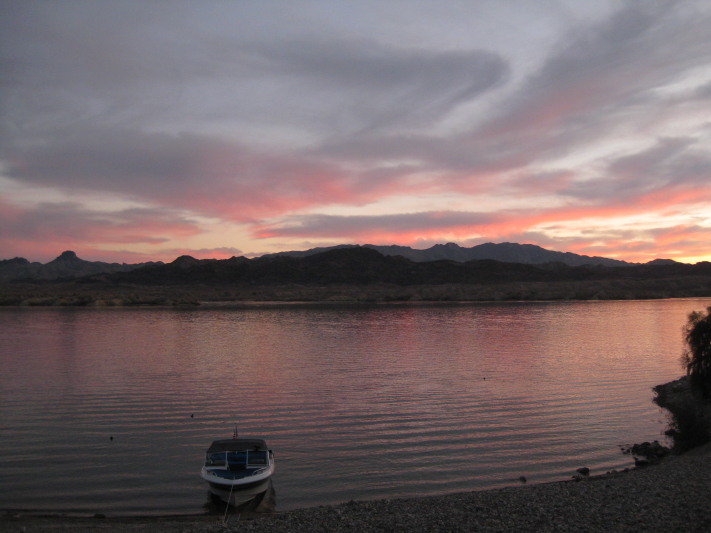
    Or you can just pull them up on the bank.

    Of course while we were there we got to see a couple of sunsets.

    and sunrises.

    That kind of ends this post. Don't have much on Yuma, but do have a few pictures of our trip across the border.